
A finished basement can feel dim even with one bright ceiling fixture. Recessed fixtures can fix that, but a clean result takes more than cutting a few holes. If you’re learning how to install recessed lighting in a finished basement, plan the layout first, confirm the ceiling is clear, then work through the wiring one light at a time.
This guide covers the tools, fixture choices, wiring, ceiling cuts, and safety checks we use when planning basement lighting for Utah homes. If the wiring is unclear or the job needs a new circuit, bring in a licensed electrician.
Step 1: Plan the Basement Lighting Layout and Turn Off Power
The goal is an even light pattern that fits the room, furniture, and existing wiring.
Start with a quick sketch of the basement room. Mark walls, soffits, ceiling beams, ducts, vents, smoke alarms, ceiling fans, and planned furniture. A room used for movie nights needs a different layout than a laundry area or home gym.
A common starting point is to place lights about two feet from the walls. Many installers then leave about four feet between lights. Treat those numbers as a starting point, not a rule. Low ceilings may need smaller fixtures with closer spacing, while a tall ceiling may need more output.
You can also use a simple layout formula. Divide each wall length by twice the number of lights in that row. For example, a 150-inch wall with two lights gives 37.5 inches from each side wall to the center of the first light. The lights would sit 75 inches apart from center to center.
Check the layout against the room’s use. Keep light away from the edge of a screen, place brighter coverage near a workbench, and avoid putting a ceiling fixture where a ceiling fan blade will block it. Layered lighting often feels better than filling the whole ceiling with one fixture type. Recessed lights can handle general light, while a focused light can cover a desk or work area.
Before touching a switch or fixture, turn off the breaker. Do not trust the switch alone. Test the wires with a voltage tester, then test the tester on a known live source and test it again after shutting power off.
Our basement lighting ideas for Utah homes can help you compare recessed, focused, accent, and utility lighting before you mark the ceiling.
Tools and materials checklist:
- Voltage tester
- Drill with the fixture’s required hole saw
- Fish tape
- Screwdriver and cable connectors
- Pencil and tape measure
- Gloves, eye protection, and a stable ladder
- Lighting installation materials
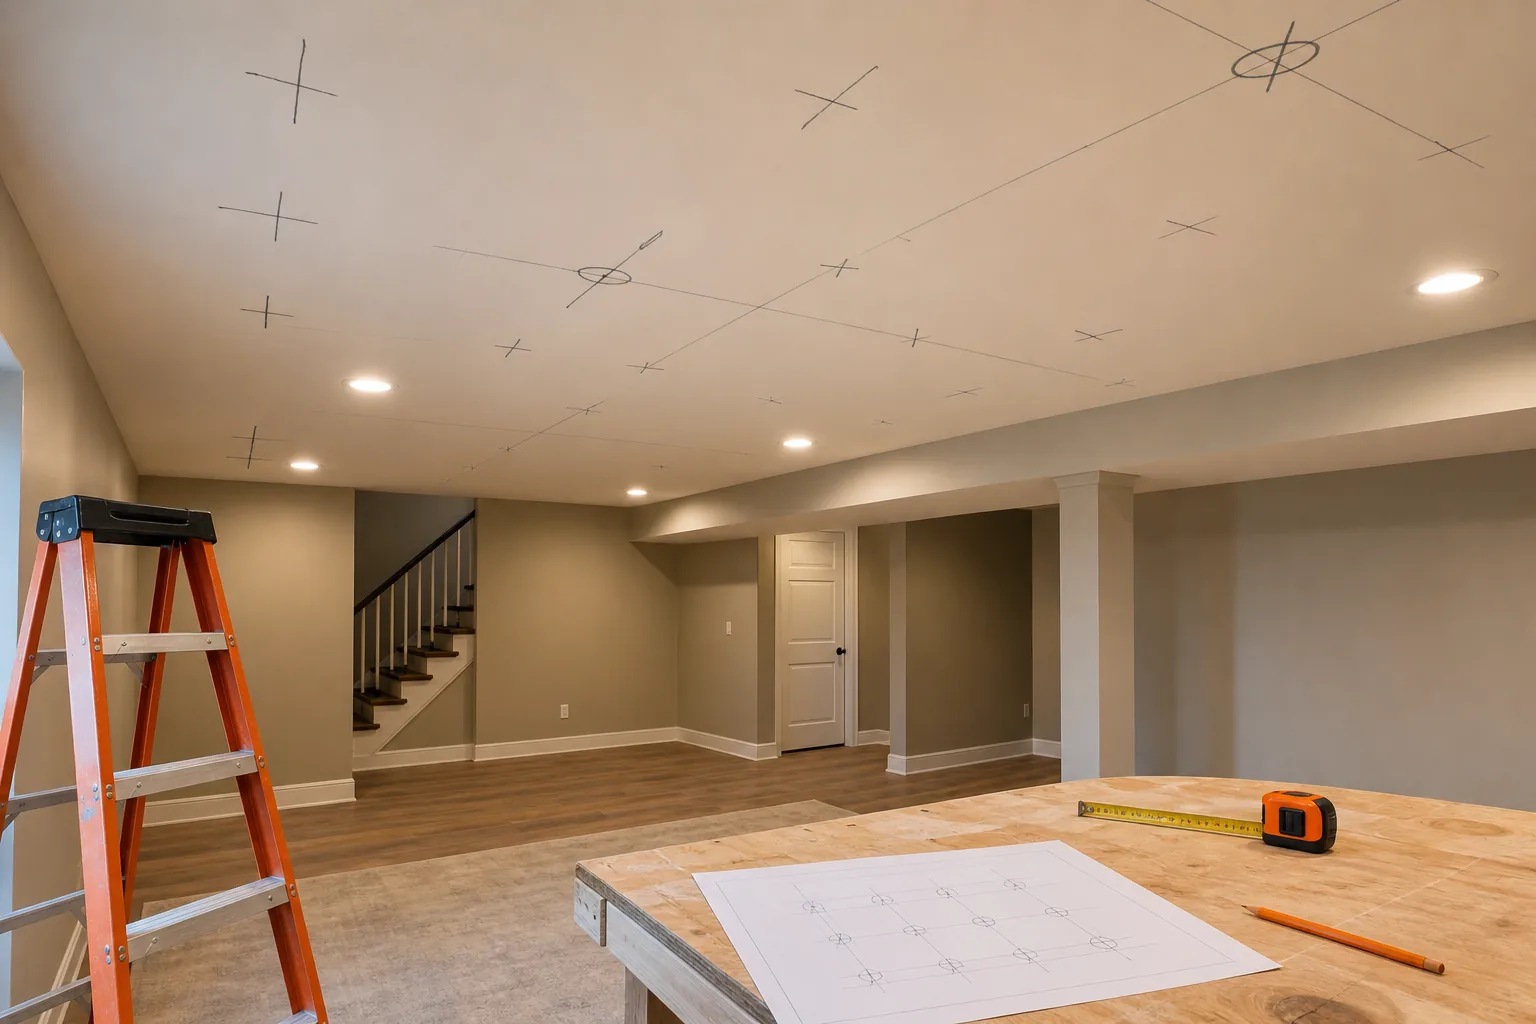
By now you should have a marked ceiling, a clear lighting plan, and a confirmed dead circuit.
Step 2: Choose the Right LED Recessed Fixtures for a Basement
The right fixture keeps the basement bright without taking away headroom or creating a heat risk.
Measure the ceiling height before you buy anything. In a low basement, fixtures with a shallow profile sit close to the drywall. They leave more headroom than a deep housing. A fixture designed for a finished ceiling also clamps to the finished ceiling, so you don’t need to open a large section of drywall.
Check the fixture’s required hole size. A four-inch light may need a different opening than a six-inch light. Some remodel jobs work better with six-inch fixtures because an old ceiling box can leave a larger hole after removal. Never assume the trim will cover your opening. Test the template on scrap drywall first.
Look for a fixture rated for insulation contact when insulation may touch the housing. IC means insulation contact. A fixture without an insulation-contact rating needs the clearance stated in its instructions. Never bury a fixture without an insulation-contact rating in insulation or wrap insulation around a driver. Heat must move away from the fixture.
Basements also need the right moisture rating. A dry finished living room has different needs than a damp utility space. If the ceiling is near a bathroom, laundry area, or known moisture source, check whether the fixture is rated for that location. Fix water problems before closing the ceiling.
These fixtures usually have low profiles and produce little heat. They also work well in rooms that need light for long periods. These fixtures can be grouped by basement use.
| Fixture choice | Best fit | Check before purchase | Watch out for |
|---|---|---|---|
| Small-room or focused-zone option | Small rooms or focused zones | Exact cutout and trim size | May need more units for even coverage |
| General-room option | General room lighting | Joist position and ceiling opening | Can look oversized in a small room |
| Low-ceiling or tight-joist-space option | Low ceilings or tight joist spaces | Driver space above the ceiling | Still needs a clear path for wiring |
| Broad, even-light option | Broad, even light in a finished room | Grid or surface dimensions | May not suit a small recessed opening |
| Utility, storage, or workshop option | Utility, storage, or workshop areas | Mounting points and damp rating | Usually looks less hidden than recessed light |
For living areas, a warm to neutral color setting usually gives the right feel. Utility and workshop spaces often suit a crisper color setting. Pick fixtures with the same color setting when lights share a room.
Confirm dimming compatibility before buying the dimmer. If you want additional control features, choose a listed dimmer that matches the fixture and wiring method. Additional control features won’t correct a poor layout, so solve the light pattern first.
By now you should have fixtures with matching cutout sizes, suitable insulation ratings, the right color, and a dimmer matched to the fixture.
Step 3: Remove Existing Fixtures and Prepare the Electrical Connections
The goal is to expose a safe power source without guessing which cable does what.
With the breaker off, remove the old fixture cover and fixture body. Support it while you loosen the screws. Once it drops, keep the wires from pulling against the box. Photograph the old connections before separating anything, but use the photo only as a record. Do not copy an unsafe connection.
Test every wire again. Identify the incoming power cable, the switched cable, and any cable that continues to another circuit. A switch box may contain more wires than the old light used. A cable marked 14-2 normally has hot, neutral, and ground conductors. A 14-3 cable adds a second hot or switched conductor, often shown with a red wire. Wire color alone does not prove a wire’s function.
If the old ceiling box is screwed into framing from inside, you may be able to remove it through the existing opening. If it is nailed or mounted from the side, you may need a larger opening. Plan the new fixture around that opening so the trim will cover it.
Never drill blindly through a joist. Plumbing, gas lines, and cables may run through hidden framing. When two light holes sit in the same joist bay, fish the cable through that open space. To cross a joist, use an existing opening, a planned access hole, or a route behind crown molding. A small patch is cheaper than a damaged pipe.
Do not make a new junction inside the ceiling without an approved accessible box. Each splice belongs in a listed electrical box with a proper cover. The basic principle is to protect conductors and contain connections, as described in basic electrical work.
For a new circuit, an altered service, or wiring that doesn’t match the plan, stop here. Utah permit and inspection needs can vary by city or county. Ask the local authority having jurisdiction, or use a licensed electrician who knows the local process.
This is the point where many DIY jobs go wrong. If you can’t trace the power from the panel to the switch and then to the first light, don’t cut more holes yet.
Step 4: Cut the Finished Ceiling and Install the Recessed Lights
The goal is a clean hole that fits the fixture and leaves enough room for the driver and cable.
Read the fixture instructions and mark the required hole size on a scrap piece of drywall. Cut the test hole first. Insert the fixture or trim ring and confirm the opening is large enough for the body but small enough for the trim to cover.
Use a visual check of the ceiling framing, then make a small pilot check at the center mark. A bent Allen key or short inspection tool can help you feel for a joist, duct, or pipe above the drywall. A small viewing tool can give you a better view if you have access to one. Move the light if the driver won’t fit above the ceiling.
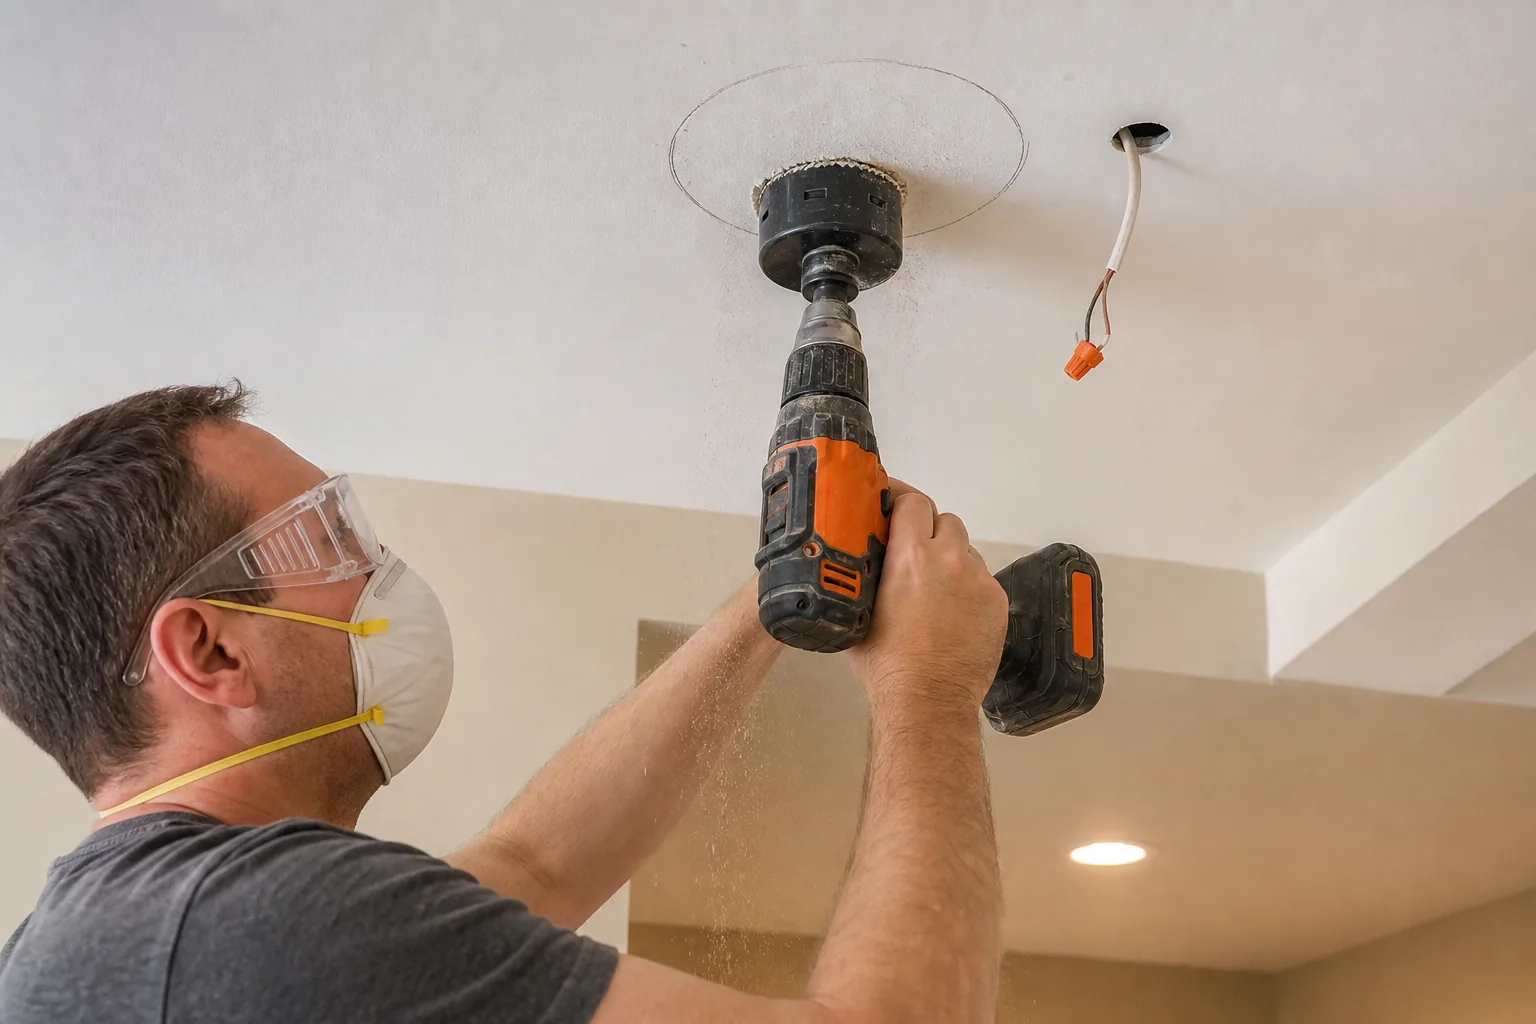
Fit the hole saw to the drill. Use low speed. Keep your face below the drill and wear eye protection. A large hole saw can grab the drywall and twist the drill. A side handle helps control it. A dust bowl under the saw can catch much of the dust, but cover nearby furniture and seal HVAC openings if possible.
Cut slowly until the pilot bit passes through. Then let the saw score the paper face before applying steady pressure. Stop when the circle is complete. Pull out the drywall disk and clean the edge with a hand tool. Do not make the hole larger just because the fixture feels tight. Check the manufacturer’s cutout size instead.
Feed the cable through the opening before you install the light. Leave enough length to make the connection without pulling the cable tight. Keep the cable away from sharp metal edges and hot parts. If the fixture has a separate driver box, place that box where it can fit without crushing insulation.
Connect the fixture only as its instructions show. Most units have a hot lead, neutral lead, and ground connection. Secure the cable with the correct connector. Push the driver into the ceiling space, then press the spring clips or remodel brackets into place.
Do not force a fixture beside a joist, duct, or pipe. A fixture designed for limited depth may fit where a deeper housing cannot, but it still needs room for its driver and wiring.
Our team at LIFT Construction sees this as a design issue as much as an electrical one. In a Northern Utah basement, ceiling height, duct runs, insulation, and future ceiling repairs all affect the best fixture location. If you need help with the broader ceiling plan, our guide to basement ceiling ideas covers ways to work around those limits.
By now you should have each fixture seated flush, with no cracked drywall edge and no pinched cable.
Step 5: Finish the Wiring, Test the Lights, and Check Basement Safety
The goal is to make every connection secure, test the circuit in stages, and leave the basement safe for daily use.
Connect the lights in the planned sequence. Keep all splices inside approved boxes. Match the hot, neutral, and ground conductors according to the fixture instructions. Secure each connection by hand, then give each conductor a gentle pull. A loose wire can create heat and intermittent light.
If you are using a switch with more than one function, identify which terminal receives constant power and which sends switched power. A 14-3 cable may carry separate switched conductors. Never guess based on the red wire alone. If a switch uses a break-off tab to separate two feeds, follow the switch manufacturer’s diagram and confirm the circuit arrangement first.
Install the dimmer only after confirming its load rating and LED compatibility. Put the control in a box with enough room for the device and its wires. A crowded box makes future repairs harder and can damage a control.
Before you close every opening, turn on the breaker and test the first light. Then test the switch, dimmer, and each added fixture. Check for flicker, delay, buzzing, heat, or a breaker that trips. Turn power back off before changing any connection.
Walk through the basement after dark. Look for glare from the trim and dark areas near stairs. Confirm that the stair path is lit. Recessed lights don’t replace required smoke alarms, carbon monoxide alarms, or safe egress. If your remodel changes a bedroom or sleeping area, review the local rules for egress separately.
Basement moisture needs attention too. Don’t seal over a damp ceiling or hide a leak above new fixtures. Keep insulation in its intended position. Make sure every fixture’s insulation and moisture rating matches its location.
We recommend keeping the fixture instructions, circuit notes, and permit records with your home files. That small step helps an electrician or future owner understand what changed from start to finish.
Once the lights work, watch them for several minutes. A warm trim or a nuisance trip means you should shut the circuit off and find the cause before using the room.
FAQ
Can recessed lights be installed in a finished basement without attic access?
Yes, you can install recessed lighting in a finished basement without attic access when you can fish cable through safe joist bays and use remodel-rated fixtures. Fixtures designed for tight spaces often fit tight spaces. You still need to check for ducts, pipes, insulation, and framing before cutting. Use access holes when needed instead of drilling blindly.
How far apart should recessed lights be in a basement?
Start with lights about two feet from the wall and roughly four feet apart, then adjust for ceiling height and room use. This spacing is only a planning guide for basement lighting. A focused area may need closer coverage, while a low ceiling may look better with fewer, softer fixtures. Test the layout on paper first.
Do recessed lights in a basement need to be rated for insulation contact?
Recessed lights need to be rated for insulation contact when insulation may contact the housing. A fixture rated for insulation contact is designed for insulation contact, while a fixture that requires clearance needs the distance stated in its instructions. Check the label before installation. Never cover a fixture or driver with insulation unless the manufacturer allows it.
What size recessed lights work best in a finished basement?
Fixtures in different sizes both work in finished basements. Fixtures suited to smaller rooms or focused areas can work well. Fixtures intended for broad general coverage may cover a larger opening left by an old ceiling box. The best choice depends on cutout size, trim scale, ceiling height, and light output.
Why do my new recessed lights flicker or trip the breaker?
Flicker or a tripped breaker can come from a loose connection, an overloaded circuit, a dimmer that does not match the fixture, or a fixture fault. Turn the breaker off before inspecting anything. Check the manufacturer’s dimmer list and confirm each splice sits in an approved box. If the breaker trips again, stop using the circuit and call a licensed electrician.
For most Utah homeowners, the safest path is to plan the layout yourself and have an electrician handle uncertain wiring or permit work. If the project also includes drywall, insulation, or a larger basement remodel, LIFT Construction can help coordinate the work from start to finish. Begin by marking the room plan and checking the ceiling space before buying fixtures.