
A basement bathroom needs more than a good-looking tile sample. Moisture, low light, tight layouts, and plumbing below the sewer line all shape the right choice. Use these bathroom tile ideas to plan a space that looks finished and performs well. We’ll help you move from the first measurement to a tile-ready plan with LIFT Construction.
We reviewed 6 top-ranking bathroom tile pages, from Daltile, Edward Martin, The Tile Shop, Artistic Tile, Arizona Tile, and Tile Club. None of the 6 mention sewer ejector pumps, waterproofing membranes, or permit requirements for a basement bathroom. Only 2 of the 6 discuss slip resistance at all, and 0 cite a DCOF number. Basement bathrooms sit below the main sewer line and face moisture risks that a general tile page never addresses.
Step 1: Assess Your Basement Bathroom Before Choosing Tile
The best bathroom tile ideas start with the room itself. Before you pick a color or pattern, check the space, the plumbing, and the moisture risks.
Measure the floor area, wall height, shower footprint, door swing, and space around the toilet. A basement half bath often uses about 35 to 50 square feet. A full bath with a shower may need 50 to 75 square feet. These numbers are planning guides, not fixed rules.
Next, look for capped drain pipes near the foundation walls. These pipes may be a rough-in for a future bathroom. An existing rough-in can reduce the amount of concrete work and new plumbing needed.
Basement wastewater may need help moving up to the main sewer line. Plumbing equipment and drainage details depend on the layout and existing connections. Your plumber or contractor should review the best fit before the floor plan is set.
Moisture deserves the same attention. Check for damp walls, musty odors, cracks, and poor air flow. Plan a proper exhaust fan, then confirm where it can vent. A bathroom below grade also needs a properly prepared shower area, sound substrate, and a floor surface suited to wet use.
Permits and inspections may apply to new plumbing, framing, and electrical work. Local requirements vary by city, so confirm them before demolition. The basic function of a basement also affects how you plan light, drainage, and ventilation in the room.
We also look at how the bathroom will work with the rest of the basement. A bathroom near a guest room may need a quieter door and stronger sound control. One beside a workout room may need an easy-clean floor. If the ceiling is low, space-saving fixtures and door choices can help preserve room.
By now, you should have a measured room plan, a rough plumbing plan, and a list of moisture concerns. Don’t choose tile until those three items are clear.
Step 2: Choose Bathroom Tile Materials That Suit the Space
Bathroom tile ideas only work when the material fits the surface. A shower wall, shower floor, vanity wall, and main floor each face different demands.
Porcelain is a dense tile with low water absorption. Learn more about porcelain tile. That makes porcelain a strong choice for wet walls and bathroom floors when the full installation system is correct.
Ceramic tile gives you many colors, shapes, and finishes. It works well on walls and in light-use areas. Use a properly glazed product on shower walls, and pair it with the right waterproof backing.
Natural stone brings one-of-a-kind veining and texture. A textured natural stone can add grip underfoot, while travertine brings warm earth tones. Both need more care than many porcelain products. Acidic cleaners can damage some stone surfaces, so choose a cleaner made for the material.
Glass tile can reflect light in a dark basement. Keep it on walls, niches, or a backsplash. Its smooth surface and fragile edges make it a poor choice for a shower floor.
Mosaic tile has many grout joints. That takes more time to install, but the joints can add traction on a shower floor. Small hexagons, penny shapes, and simple squares can also bring pattern into a room without taking over the whole design.
We usually suggest choosing the floor tile first. It has the most direct effect on safety. Then select wall tile that supports its color and texture. For more local direction, compare these current bathroom tile ideas with the light and layout in your own basement.
Order samples before you commit. A tile that looks warm online may look cool under basement LEDs. Place samples near the vanity, shower, and floor. Look at them in the morning and at night.
By now, you should have a short list of materials for each surface. Keep one backup option in case a trim piece or special finish has a long lead time.
Step 3: Build a Tile Layout With Color, Pattern, and Scale
Good bathroom tile ideas depend on scale. The same tile can feel calm in one layout and crowded in another.
Start by drawing the room to scale. Mark the door, vanity, toilet, shower valve, drain, niche, mirror, and lighting. Then draw the tile lines. This shows where cuts will land before installation begins.
Large-format tile can make a small bathroom feel more open because it reduces grout lines. It can work well on a floor or shower wall. But large tile needs a flat surface, careful handling, and enough room for clean cuts around corners.
A vertical tile layout can make a low ceiling feel taller. A stacked layout gives a clean, modern look. A vertical offset adds a little movement without the busy feel of a complex pattern.
For a basement with limited natural light, light tile can help reflect the lamps. White, pale gray, sand, and soft beige are useful starting points. A single-color scheme can also make the room feel less chopped up. Add depth through a matte floor, a lightly glossy wall, or a raised texture.
Patterns need a clear job. Subway tile can frame a shower. A geometric floor pattern can add shape. Checkerboard tile creates a strong focal point. A handmade-look tile brings subtle variation. Use one main pattern, then let the other surfaces stay quiet.
Think about storage before you lock the layout. A niche needs framing space, waterproofing, and a location that works with the shower valve. A vanity that leaves more floor visible can make the room feel more open, but it still needs solid wall support. The mirror should align with the vanity and lighting, not land in the middle of a grout line by accident.
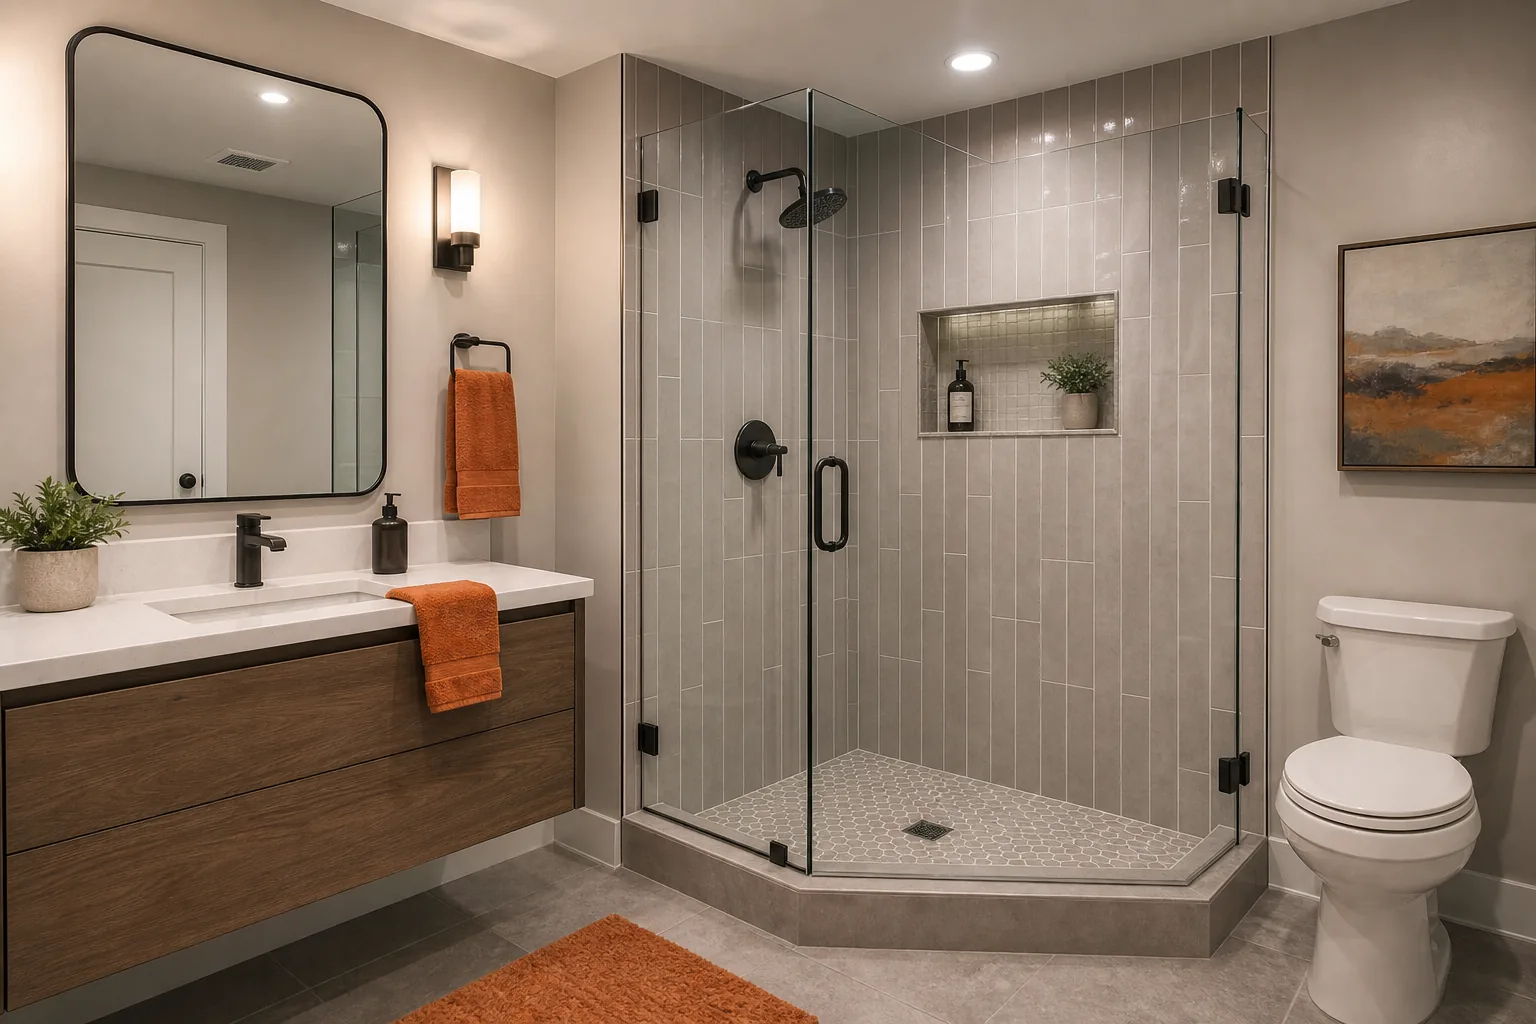
Before installation, dry-lay the pattern. Place a few tiles on the floor or use a paper layout. Check the first and last cuts on each wall. A narrow sliver beside a door often looks worse than a planned shift in the starting point.
We can help you compare a bold accent wall with a quieter full-room design. If the room is especially tight, these small bathroom remodel ideas can help you pair tile scale with storage and compact fixtures.
By now, you should have a marked layout with approved tile direction, grout width, accent placement, and niche location. Don’t approve the design from a single sample board. Review it in the actual room.
Step 4: Plan for Safety, Maintenance, and Long-Term Performance
Bathroom tile ideas must account for wet feet and daily cleaning. A pretty floor that turns slick after a shower is the wrong floor.
Ask for wet slip data, not only a dry showroom rating. Choose a surface with dependable traction under wet conditions, while a higher rating may provide more margin.
A matte or textured floor surface is often a sensible choice. Small mosaics also add grout joints, which can give bare feet more points of contact. Large-format tile can still work if its wet rating fits the room and its surface is not glossy.
Do not use wall glass mosaic as a floor substitute. Smooth, polished stone can also become hard to manage when wet. If someone in the home has balance or mobility limits, ask about a shower entry designed for easier access, grab-bar blocking, a bench, and a floor with reliable wet traction.
Maintenance starts with the grout plan. A close grout color hides small marks. A strong contrast makes the pattern stand out but may show buildup sooner. Seal grout when the product and installer call for it. Natural stone usually needs more care than porcelain.
Waterproofing sits behind the tile. Tile and grout alone do not protect the wall assembly. The shower needs a suitable backer, a water-resistant layer, sealed penetrations, and a drain slope that moves water away. An appropriate tile-installation material is commonly used for tile installation in wet areas. Mastic is not a universal substitute, so follow the tile and waterproofing system instructions.
Ventilation matters after the work is done. Run the exhaust fan during a shower and for a suitable period afterward. Keep the room dry enough that moisture does not linger on grout, trim, or painted walls.
A safe choice is simple: select the floor based on wet traction first, then fit the color and pattern around it. Style comes second in a shower floor.
Step 5: Finalize the Design and Coordinate Installation With LIFT Construction
The last step turns bathroom tile ideas into an installation plan. We want every part decided before demolition begins.
Make one finish sheet for the project. Include the floor tile, shower wall tile, shower floor tile, accent tile, trim, grout, caulk, vanity, countertop, fixtures, mirror, and lighting. Add the tile direction and grout joint size. This gives the crew one clear reference.
Measure the areas again and let the installer confirm quantities. Many tile jobs need extra material for cuts, waste, future repairs, and pattern matching. The amount depends on the tile size, room shape, and layout. Special trim should be ordered with the main tile, not after the walls are open.
We also confirm delivery dates before demo. A missing niche trim can stop a wall. A delayed vanity can hold up plumbing connections. Review every box when it arrives. Check color, size, finish, quantity, and shade variation.
LIFT Construction coordinates basement finishing and bathroom remodeling for homeowners across Northern Utah. The layout should align with the plumbing and electrical plan, and the substrate should be checked before tile goes down. That process helps prevent a finished tile wall from blocking a fixture or hiding an access point.
During the build, the sequence usually starts with demolition and inspection. Next comes framing, rough plumbing, electrical work, substrate preparation, waterproofing, tile installation, grout, and fixture trim-out. The exact order may change with the home, but the handoffs need to be clear.
We pay close attention to shower niches, floor slopes, transitions, and tile cuts around fixtures. Those small details are easy to miss in a sketch. They are also the details homeowners see every day.
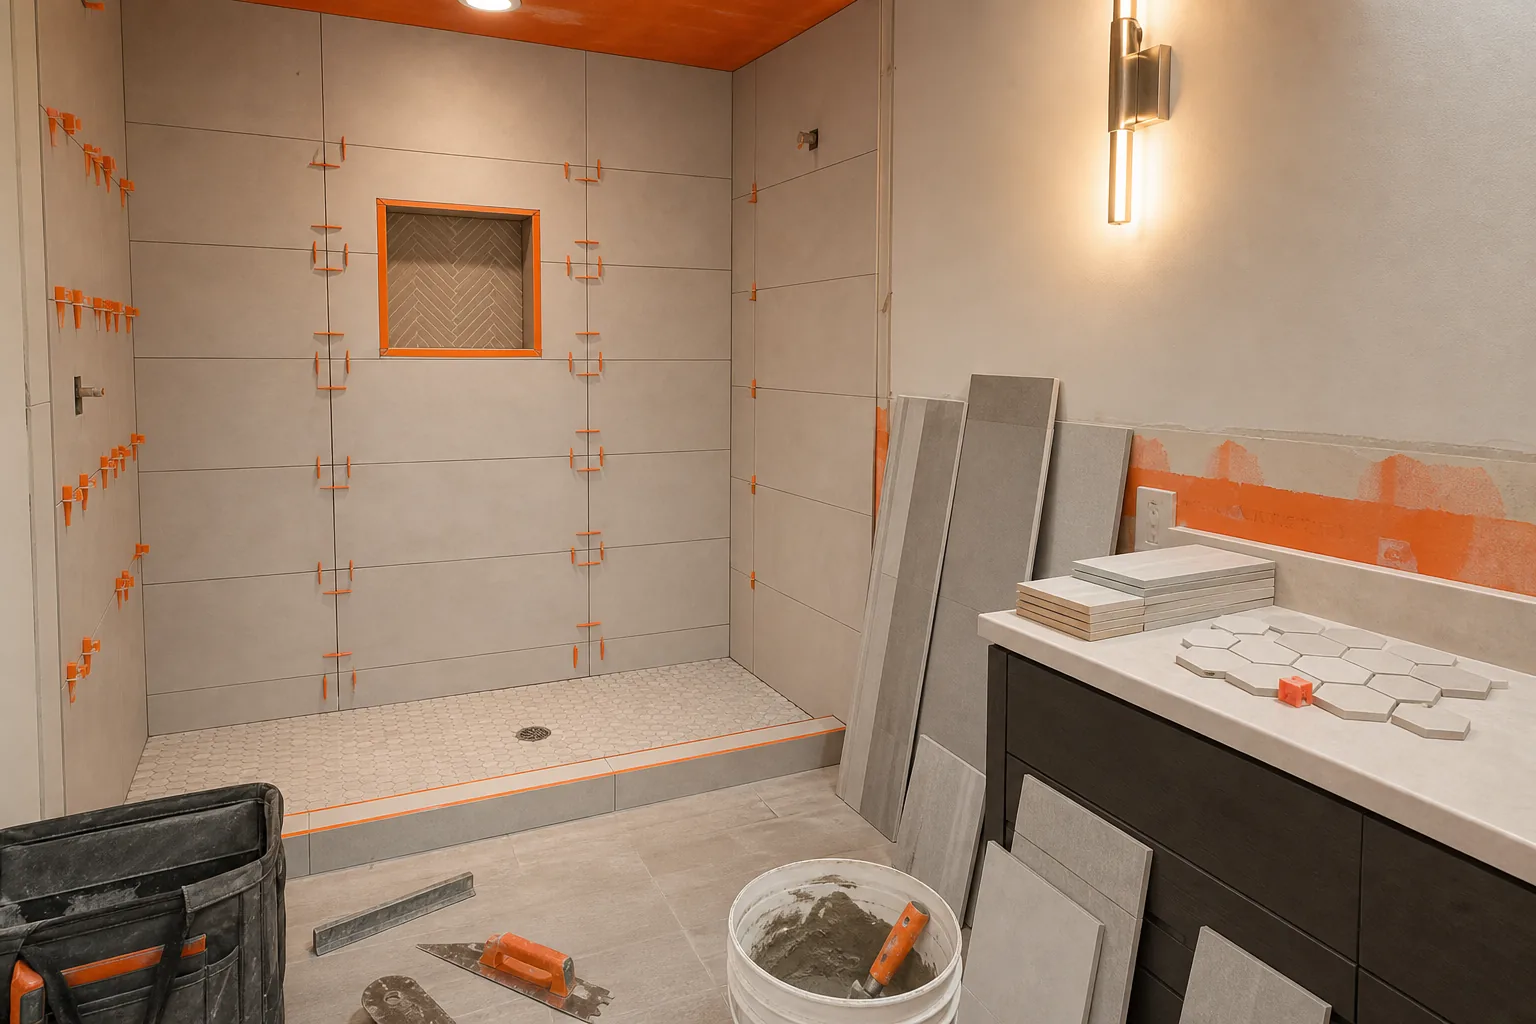
Before final approval, inspect the grout joints, trim lines, caulked corners, drain fit, and fixture alignment. Check that doors open without hitting the vanity. Run the fan and test the shower flow. Walk the floor with bare feet once it is clean and dry.
We keep the conversation open through each handoff, from the first plan to the final detail. For a broader room plan, our modern bathroom remodeling guide can help you connect tile with fixtures, storage, and lighting.
Your milestone is a signed-off finish sheet, confirmed material delivery, approved waterproofing plan, and clear installation schedule. That is when the project is ready to move from design into the work.
FAQ
What tile is best for a basement bathroom?
Porcelain is often the best all-around tile for a basement bathroom because it has low water absorption and handles daily wear well. Use a wet-rated product with a surface suited to floors. Ceramic works well on many walls. The right choice still depends on waterproofing, lighting, room size, and how the bathroom will be used.
What color tile makes a small bathroom look bigger?
Light colors can make a small bathroom feel bigger by reflecting more light. Soft white, pale gray, beige, and sand are useful choices in a dark basement. A matching or closely related grout color can reduce visual breaks. Add interest with texture or one accent wall instead of several competing patterns.
Is large-format tile a good idea for a basement bathroom?
Large-format tile can work well in a basement bathroom when the surface is flat and the layout allows clean cuts. Fewer grout lines can make the room feel more open. Large tile is less forgiving around corners and drains, so have the installer confirm the substrate and layout before ordering.
What tile is safest for a shower floor?
Small matte mosaics are often a safe shower-floor choice because their grout joints add texture and grip. A tile with a surface suited to wet areas can also work when its wet slip rating suits the application. Avoid glossy glass tile on floors. For accessibility needs, review the shower entry, slope, drain, bench, and grab-bar support as one system.
How much extra tile should I buy?
Many tile projects need extra material for cuts, waste, pattern matching, and future repairs. A common planning range is about 10% to 15%, but the exact amount depends on the room and tile design. Have the installer confirm the quantity before purchase, especially with large-format or patterned tile.
Conclusion
Choose your basement bathroom tile by working in the right order: assess moisture and plumbing first, select materials by surface, then approve the layout and safety details. Bring your measurements, samples, and finish sheet to LIFT Construction so we can review the plan and coordinate the work from start to finish.