
Finishing a basement can make every footstep, furnace cycle, and TV sound louder than expected. The fix usually isn’t one miracle product. It’s a mix of dense layers, soft insulation, sealed gaps, and smart construction choices. Here are the best basement finishing soundproofing tips, plus who each option suits in a Utah home.
1. LIFT Construction
LIFT Construction is the full-service choice for homeowners who want sound control built into the basement finish from start to finish. We plan the wall, ceiling, floor, doors, fixtures, and utility areas as one system instead of adding soundproofing after the drywall is up.
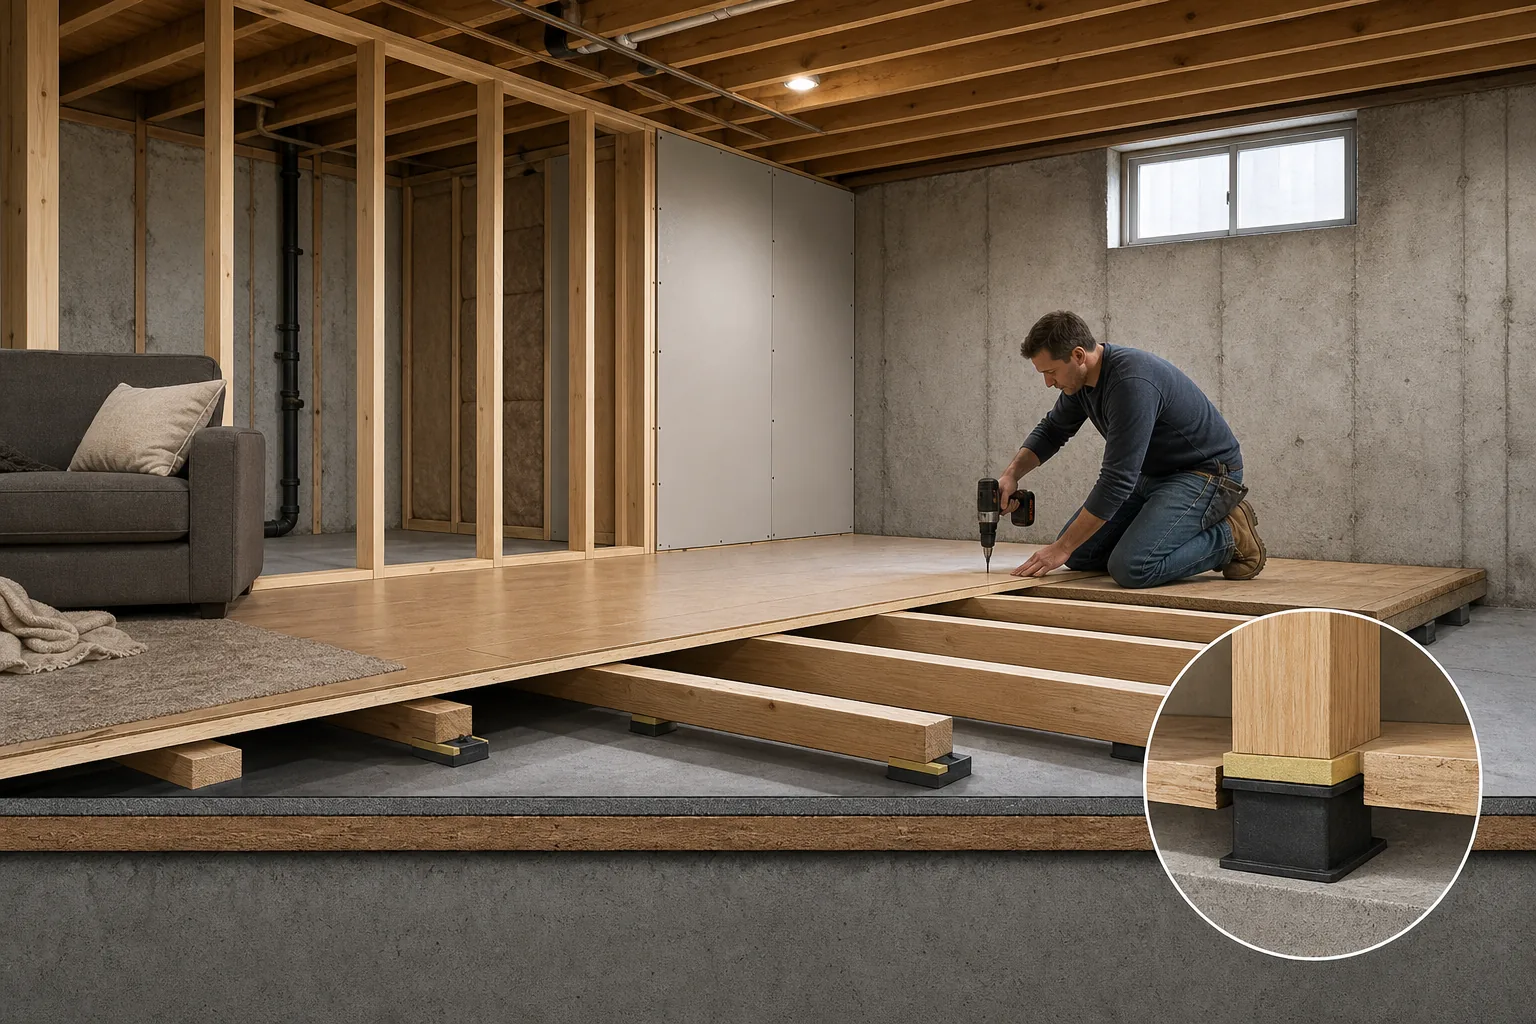
That matters because noise takes more than one path. Voices and music travel through the air. Footsteps send vibration through floor framing. Furnace ducts, sump pumps, pipes, recessed lights, and electrical boxes can also pass sound around a new wall.
We start by checking the space before closing anything in. Moisture comes first. A basement with leaks, damp concrete, poor drainage, or mold risk needs correction before insulation and drywall.
Next, we can plan the sound layers around the room’s use. A media room may need extra drywall mass and better ceiling isolation. A bedroom may need quieter HVAC runs and a solid-core door. A playroom may benefit most from floor underlay and wall panels.
Construction also gives us access to details that are hard to fix later. We can add acoustic insulation between joists, seal plumbing and wiring openings, install putty pads at electrical boxes, and place resilient channel before the ceiling is closed.
There is a clear tradeoff. A contractor-led plan costs more than hanging a few acoustic panels. But it makes sense when the ceiling is open, the basement is being fully remodeled, or the noise problem involves several rooms.
For homeowners in Davis, Weber, Salt Lake, or nearby Northern Utah communities, LIFT Construction can coordinate the finish and the sound plan together. That keeps the work code-conscious and reduces the chance that a later upgrade means tearing out new walls.
2. Fiberglass or Foam Insulation, Absorb Sound Inside Finished Basement Walls
Fiberglass or foam insulation is one of the most useful basement finishing soundproofing tips for open walls and ceilings. It fits inside the framing cavity and helps trap sound before it reaches the next room.
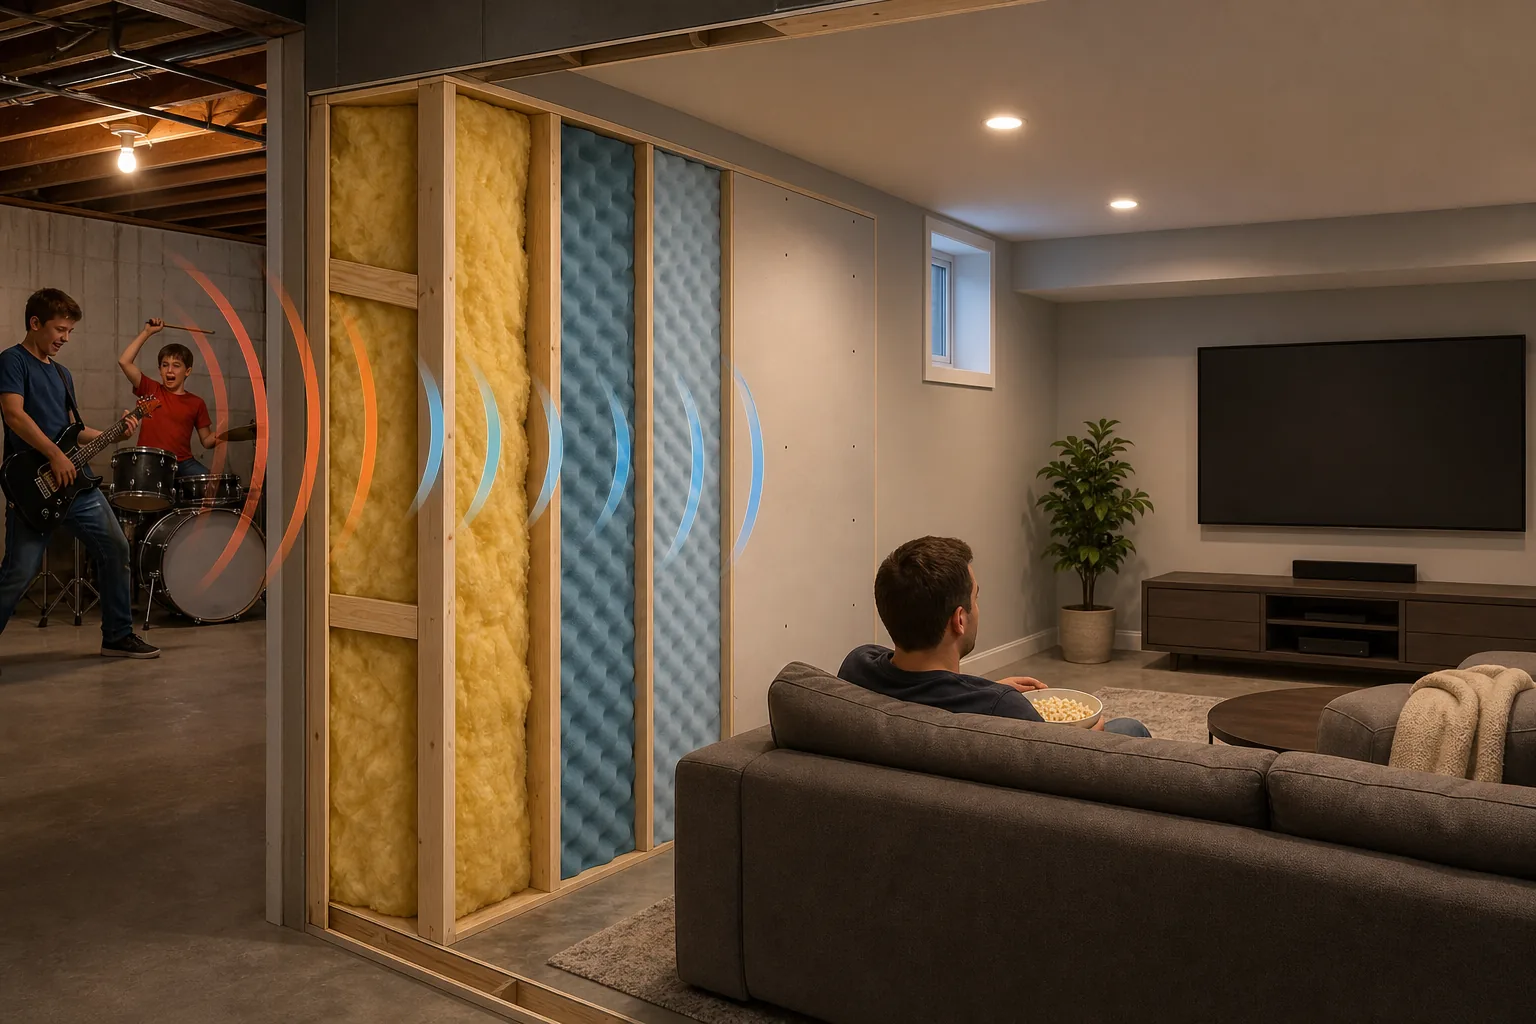
This option is best for a basement that is already being framed. It won’t do much when placed on top of a finished wall, and it can’t stop every footstep because impact noise travels through the structure itself. If you’re weighing moisture control, R-values, installation methods, and costs, compare these basement insulation types before choosing an assembly.
Acoustic insulation works best when it fills the cavity without being crushed. Mineral wool is also used for this kind of work. It is stiff enough to stay between studs and can be cut around blocking, pipes, and wire runs. Standard fiberglass can still be a reasonable choice when budget or availability leads the decision.
The research range for fiberglass or foam insulation is between $500 and $3,000. The final amount depends on the square footage, access, wall layout, and whether the ceiling is included. Treat that range as a planning figure, not a quote.
Insulation should sit behind a sealed wall system. Before drywall goes up, fill gaps around pipes and cables with an approved acoustic sealant. Pay close attention to the joint where the wall meets the concrete floor. Small openings can weaken an otherwise well-insulated room.
Soundproofing also needs moisture control. Never cover a wet foundation wall with organic material and hope the problem disappears. Check drainage, humidity, and the condition of the slab first.
Soundproofing involves both blocking and absorbing sound. That distinction helps explain why insulation works better as part of a wall assembly than as a stand-alone cure.
One caveat: foam and fiberglass are not interchangeable in every basement wall. Product type, fire rating, vapor control, and local code requirements can affect the right assembly. Have the wall design checked before installation, especially around mechanical rooms and sleeping areas.
3. Mass Loaded Vinyl Sound Barrier, Add a Dense Layer Against Noise Transfer
Mass Loaded Vinyl, or MLV, adds a dense flexible layer to a wall, ceiling, or floor assembly. It is a good fit when you need more mass but have limited room for a thicker build-out.
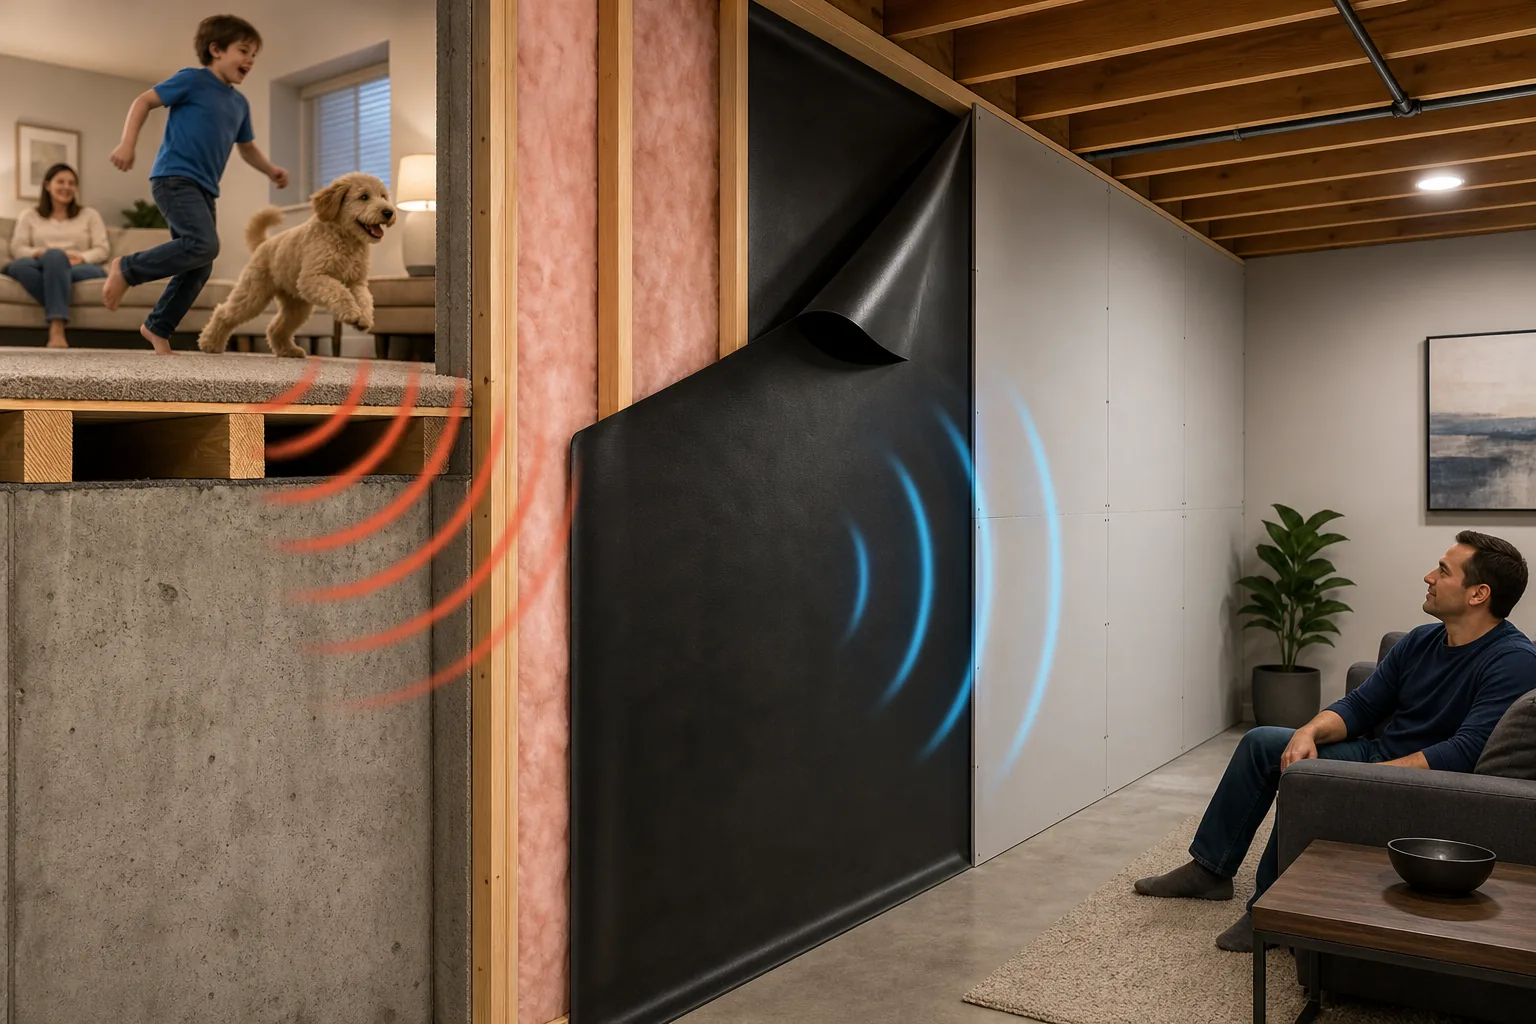
MLV is best for homeowners dealing with airborne noise, such as voices, music, or television sound. It can also help with some impact noise when installed as part of a complete ceiling or floor assembly, but it won’t erase vibration by itself.
Installers usually place MLV over framing or between layers of drywall. Seams need care. A small gap, loose edge, or unsealed opening gives sound an easier route through the assembly. The layer should work with acoustic sealant and solid drywall coverage.
For an existing finished ceiling, one approach is to seal gaps first, add MLV, then install another drywall layer. A heavier drywall layer can add still more mass. Use proper screws into the framing or approved support system. Adhesive alone is not a substitute for secure fastening.
The video above shows why an airtight ceiling matters. It also demonstrates the difference between adding mass and separating the ceiling from the joists with resilient channel.
MLV costs more than a basic layer of drywall, and its weight makes handling awkward. Wear gloves and eye protection when cutting it. A sharp utility knife, straight edge, and two-person lift can make the work safer.
Don’t confuse MLV with a replacement for insulation. MLV adds mass. Insulation absorbs sound in a cavity. Resilient channel reduces the path for vibration. Strong results usually come from combining those jobs instead of asking one material to do all three.
The best use case is a room with a clear noise source and an accessible surface. If noise comes from a furnace, duct, or plumbing line, deal with that source first.
4. Acoustic Panels, Reduce Echo in a Basement Media or Recreation Room
Acoustic panels are the easiest basement finishing soundproofing tips to add after a room is complete. They reduce reflected sound inside the room, so speech is clearer and music feels less harsh.
They are best for echo control, not full sound isolation. A panel on the wall won’t stop footsteps from the floor above. It also won’t seal a gap around a door or stop sound moving through an open ceiling cavity.
Use panels on the first reflection points near speakers or on broad hard walls. In a recreation room, placing panels across from one another can help tame repeated reflections. Leave some wall surface uncovered so the room doesn’t feel overly dull.
Check the actual size and mounting method before setting a budget.
Good placement matters more than random placement. Stand in the room and clap once. If the sound rings back from one wall, start there. For a basement theater, test the room after the main furniture is in place because sofas, curtains, and rugs also change the sound.
Acoustic panels are surfaces designed to absorb sound energy. That is different from blocking sound at a wall or ceiling. Think of panels as room treatment, not a substitute for construction work.
Panels are a smart first purchase when the room sounds hollow and the main goal is better speech or movie audio. They are less useful when the complaint is a child hearing every footstep upstairs.
5. Add Carpeting with Soundproof Underlay, Dampening Footsteps and Floor Noise
Carpeting with soundproof underlay dampens sound. Materials can include carpet, soundproof underlay, area rugs, and rubber floor mats.
The underlay sits below the carpet and adds a softer break between shoes, furniture, and the subfloor. Area rugs can help in rooms where wall-to-wall carpet isn’t the right fit. Rubber floor mats may work near exercise equipment or a play zone.
Floor work must start with the slab. Look for cracks, damp spots, uneven areas, and signs that water enters at the wall joint. A finished floor can hide trouble, so moisture checks belong before underlay goes down.
Carpet won’t solve airborne noise that comes through the ceiling. It also cannot replace an isolated floor when heavy impact noise is the main issue. An isolated floor treatment may be worth discussing for a serious impact problem, but it takes more planning and height than a rug or underlay.
Here’s a quick way to match the floor treatment to the complaint:
| Noise problem | Best first move | What it won’t fix |
|---|---|---|
| Footsteps inside the basement | Carpeting with soundproof underlay | Noise entering through the ceiling |
| Echo during movies or games | Carpet plus wall treatment | Sound passing through a shared wall |
| Exercise or play impact | Rubber mat or thicker underlay | Vibration through floor framing |
| Damp or uneven concrete | Moisture and slab correction first | Any finish installed too soon |
For Utah homes, basement flooring options may suit different moisture and use needs. The quietest choice isn’t always carpet. It depends on the room, the slab, and the source of the noise.
When a basement is being remodeled, we can coordinate floor height with doors, stairs, vents, and trim. That small planning detail prevents a new floor from blocking a door swing or leaving awkward gaps.
Details that make every option work better
Seal first. Acoustic caulk should close gaps around drywall edges, wiring, plumbing, ceiling fixtures, and other penetrations. Regular caulk may dry hard and crack as the assembly moves, which can reopen the sound path.
Use a solid-core door when the basement room needs privacy. Add weatherstripping around the frame and a door sweep at the bottom. A hollow door can become the weakest surface in an otherwise well-built room.
Windows need the same attention. Double-pane glass and a tight acoustic seal can reduce sound through the window opening. Check the frame, sill, and wall joint rather than focusing only on the glass.
HVAC and utility noise often gets missed. Wrap exposed ducts where appropriate, insulate noisy pipes, and isolate equipment from framing when the design allows it. A sump pump room may need its own enclosure, but access and service clearance must remain safe.
Fire-blocking is another part of the job. Blocking slows fire movement through concealed cavities, and local code may require it in basement framing. Electrical boxes may also need putty pads or other approved treatment. Never cover a box, vent, cleanout, or shutoff that needs service access.
DIY work is possible for panels, rugs, door seals, and some insulation. Use a sharp knife for batts, a stapler where the assembly allows it, and eye protection when cutting overhead. Resilient channel, double drywall, electrical changes, and fire-blocking deserve extra care because one wrong fastener can reconnect the isolated ceiling to the joists.
More soundproofing tips
Seal Gaps and Decouple the Theater Framing
For basement soundproofing methods in a Utah home theater, this step blocks air leaks and limits vibration. Sound follows the easiest path, and even a small gap can weaken a wall assembly.
Begin with the rim joist, which is the band of framing around the basement’s top edge. Seal joints where wood meets concrete. Close cracks around pipes, wires, and ducts with a product suited to that opening. Don’t bury an active leak or a heat source behind sealant.
Next, inspect the framing plan. If the theater shares a wall with a bedroom, bathroom, or stairwell, avoid a direct bridge where possible. A double-wall system leaves a break between two sets of studs. That break reduces the chance that vibration will pass straight through the wood.
Resilient clips and channels can also separate drywall from framing. These parts create a flexible connection, but they only work when installed in the right direction and at the right spacing. A misplaced screw can short-circuit the system by joining the drywall to the stud.
Seal the bottom and top edges of the future wall. Plan for outlets before the drywall goes up. Back-to-back electrical boxes are a weak point, so offset them when the layout allows.
Our team at LIFT Construction treats sound control as part of the basement finish plan. That matters because framing, electrical work, HVAC routes, and drywall must line up. A sound layer added after rough-ins may force costly rework.
Test the seal before you cover it. Shine a bright work light from one side of a wall while someone checks the other side. The light test won’t measure sound, but it can reveal gaps that need attention. By this stage, the room should have a sealed shell and a framing plan with fewer direct vibration paths.
Fill Wall and Ceiling Cavities with RockWool Insulation
Wall and ceiling cavities are a key part of basement soundproofing for a Utah home theater. Fill them with RockWool insulation so the cavities don’t remain hollow sound chambers.
Measure each bay before cutting. The insulation should fill the space without being crushed. Gaps at the edge reduce the value of the work, while heavy compression can change the fit and make installation harder.
Start with shared walls. Then move to the ceiling below rooms where quiet matters most. The ceiling assembly often deserves extra care because footsteps, voices, and subwoofer energy can travel through joists.
Don’t use insulation as the only sound barrier. Soft fiber can absorb some sound inside a cavity, but it has little mass by itself. The final wall layers still need to block and separate the room.
Moisture deserves attention in Utah basements. Ask the contractor or manufacturer for the data that fits your exact assembly.
You can compare basement insulation types when the theater also needs a dry and comfortable finished envelope. Keep sound goals separate from thermal goals. The best insulation plan has to fit both.
Cut around pipes and wires with care. Don’t pack insulation tightly against hot equipment unless the assembly allows it. Keep access panels available for shutoff valves and service points. A hidden mechanical problem is harder to fix after the room is closed.
We photograph each cavity before drywall covers it. The record helps during inspections and gives the homeowner a clear handoff. By now, the wall and ceiling bays should be full, clean, and ready for the mass layers.
Add Mass with Drywall, MLV, and a Double-Wall System
The main sound barrier in basement soundproofing for a Utah home theater comes from mass and separation. Add heavy layers without creating new bridges between the theater and the rest of the house.
One common approach uses 5/8″ Drywall. Its material cost is $0.56 per square foot. Mass Loaded Vinyl, or MLV, costs $3.60 per square foot. These are material figures only. They don’t include labor, fasteners, waste, delivery, or the rest of the wall assembly.
Use the table as a planning aid, not a promise of performance. Available figures include cost for some materials but do not establish typical STC improvement for any method. STC, or Sound Transmission Class, is a rating used to compare how well a building assembly limits airborne sound. Your contractor should provide an estimate for the complete wall or ceiling assembly.
When the room has enough space, a double wall is often easier to reason about than a patchwork of isolated fixes. One wall supports the theater side. The other supports the adjoining room. Keep the framing separate at the floor, ceiling, and side edges.
For tighter rooms, a clip-and-channel ceiling or wall assembly may preserve more floor area. The choice depends on the existing structure, ceiling height, equipment layout, and access to utilities.
Green Glue is listed at $1.08 per square foot. If you use it, follow the maker’s coverage and cure guidance. Don’t spread it as if it were ordinary adhesive. Product placement and drywall fastening both affect the final result.
We plan speaker mounts before the final layer. A projector mount, wall-mounted screen, or heavy shelf can create a rigid bridge if it passes through the isolated wall. Build support into the theater side instead.
At this milestone, you should have a selected assembly, a written material takeoff, and a plan for every seam and penetration. That detail is more useful than a vague promise of a certain decibel reduction.
Finish the Room and Test Sound Before Closing the Project
The final stage of basement soundproofing for a Utah home theater is a closeout test. Finish the room only after you confirm that the sound path plan still works.
Before paint, inspect every drywall edge. Look at corners, outlet boxes, ceiling seams, door frames, and the wall-to-floor joint. Patch cracks with the right sealant. Don’t assume trim will cover a gap well enough.
Test at more than one volume. Play speech first. Speech helps reveal leaks through doors and partitions. Then test music with low bass. Deep bass may still be heard elsewhere, even when voices are well contained.
Have someone stand upstairs while the theater plays. Check the room beside the theater too. Write down what they hear and where they hear it. A simple location log helps separate a wall problem from a duct or door problem.
Test the HVAC system while the theater is quiet. Listen for fan noise, duct rumble, and vibration at grilles. If the theater shares a return-air path with a bedroom, ask the HVAC professional whether the design can be changed without harming system performance.
We give the homeowner a closeout list that records concealed work, access panels, product instructions, and items that still need service. LIFT Construction can coordinate basement framing, finish work, and the sound-control details as one remodeling project, from start to finish.
Don’t promise yourself silence. Ask for an assembly-based estimate instead of a single product claim.
By now, the room should have a tested door, sealed edges, covered cavities, protected utility access, and a documented handoff. Only then should you install the final screen, speakers, seating, and trim.
FAQ
What is the best way to soundproof a finished basement?
The best approach combines insulation, sealed gaps, added drywall mass, and vibration control. For a finished basement, start with the main noise path. Use panels for echo, carpet for footfall, and MLV or a new drywall layer where sound passes through a wall or ceiling. A full remodel gives LIFT Construction access to more of the assembly.
Does basement insulation reduce sound?
Yes, basement insulation can absorb sound inside open wall or ceiling cavities. Fiberglass, foam, or mineral wool works best when fitted without large gaps. Insulation mainly helps airborne noise. It won’t fully stop footsteps because impact vibration can travel through joists, drywall, and framing.
Is mass loaded vinyl worth it in a basement?
MLV can be worth it when you need a dense layer against voices, music, or television noise. It works best with sealed seams and drywall coverage. MLV costs more than simple room panels, and it won’t solve a loud pipe, duct, or poorly isolated ceiling by itself.
How do I stop footsteps from the floor above?
Footsteps need an impact-noise plan, not only wall insulation. If the ceiling is open, use acoustic insulation between joists, resilient channel, and correctly fastened drywall. If the ceiling is already finished, options are limited to added mass and surface sealing unless the drywall is removed.
Should I soundproof before finishing my basement?
Yes, soundproofing is easier before the walls and ceiling are closed. That is when you can seal penetrations, add insulation, isolate framing, treat ducts, and install putty pads. Plan moisture control and fire-blocking at the same time. LIFT Construction can coordinate those details with the rest of the basement finish.
Conclusion
For a small echo problem, start with panels, rugs, and door seals. For noise that travels through walls or ceilings, plan insulation, mass, and isolation before drywall goes up. Utah homeowners who want one team to manage moisture, code details, framing, finishes, and sound control can speak with LIFT Construction about a basement plan designed for the space from start to finish.